Integration with NetSuite
Overview: This guide completes the following steps:
-
NetSuite Setup
- Token Based Authentication [TBA]
- Basic Authentication
- Multiple Wage Accounts
- Export Settings:
- Journal Entry
- Paycheck Journal
- Export and View Data
- Business Payments
- Single SignOn
NetSuite Setup [Token Based Authentication -TBA]
[Recommended and mandatory for 2 Factor Authentication]
- Login to SimplePay
- Go to Add-Ons > NetSuite > Setup
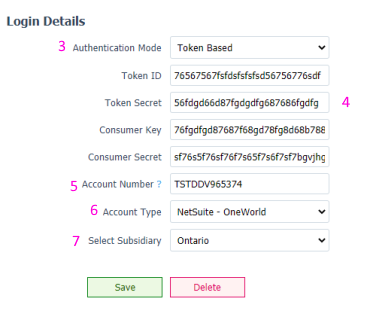
- Select Token Based from Authentication Mode options
- Enter your NetSuite Token ID, Token Secret, Consumer Key and Consumer Secret.
[Updating NetSuite Authentication Method to Token-Based] - Enter Account Number
- For NetSuite OneWorld you can find account number in your NetSuite OneWorld
account here:
- Setup > Custom > NC Product Registration
- For standard NetSuite you can find account number here:
- Setup > Integration > Web Services Preferences
- For NetSuite OneWorld you can find account number in your NetSuite OneWorld
account here:
- Select Account type (NetSuite / NetSuite OneWorld)
- If NetSuite OneWorld Account is selected, Subsidiary selection is mandatory.
NetSuite Setup [Basic Authentication]
This method only works if NetSuite 2 factor auth is not enabled
- Login to SimplePay
- Go to Add-Ons > NetSuite > Setup
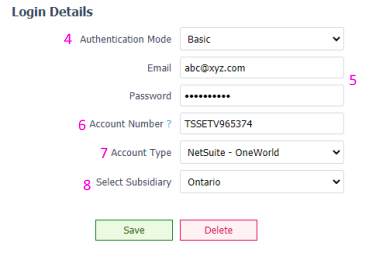
- Select Basic from Authentication Mode options
- Enter your NetSuite Login information
- Enter Account Number
- For NetSuite OneWorld find account number here:
- Setup > Custom > NC Product Registration
- For standard NetSuite find account number here:
- Setup > Integration > Web Services Preferences
- For NetSuite OneWorld find account number here:
- Select Account type (NetSuite / NetSuite OneWorld)
- If NetSuite OneWorld selected. Subsidiary selection is required.
Payroll export options
- Payroll can be exported from SimplePay to NetSuite as:
- Journal Entry
- A separate journal for each employee
- Journal entry grouped by Team for each pay period
- Journal entry grouped by Department for each pay period
- A separate journal for each pay period
- Paycheck Journal
- A separate journal for each employee
- Paycheck Journal feature cannot be selected for Non-Canadian Subsidiaries in NetSuite One World account
- Journal Entry
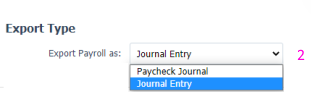
- Set Export Type from Add-Ons>Accounting>NetSuite> Account Settings
Export as Journal Entry
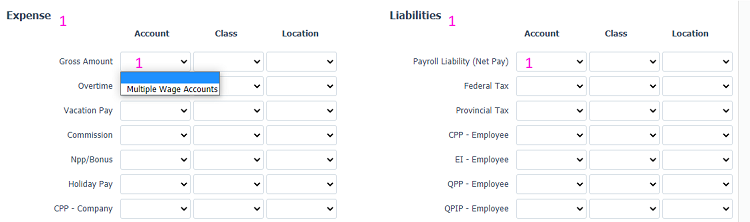
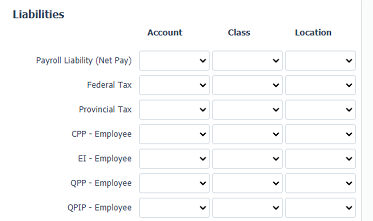
- In Account Settings, select Export Payroll as Journal Entry
- Chart of Accounts will be populated from NetSuite. Every SimplePay expense and
liability
will be mapped to a chart of accounts imported from NetSuite in drop lists.
- Accounts which have currency other than CAD will be disabled and cannot be selected
- Create Chart of Accounts in NetSuite
- Chart of Accounts can be created in NetSuite from:
- Setup > Accounting > Chart of Accounts
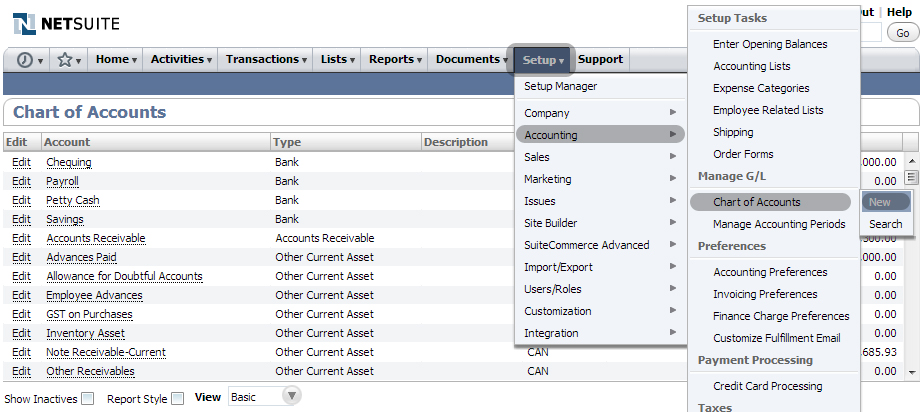
- Chart of Accounts can be created in NetSuite from:
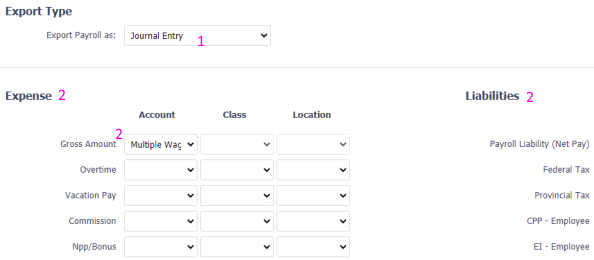
Multiple Wage Accounts setup
If employees are managed in multiple Wage Accounts in NetSuite, they can be mapped in SimplePay NetSuite>Account Settings [for both Journal Entry and Paycheck Journal].
- for Journal Entry, Multiple Wage Account option is available for all Expense and Liabilities.
- for Paycheck Journal, Multiple Wage Account option is available only for Payroll Liability [Net Pay].
- Select Multiple Wage Account option and Save
- After Save, Manage Wage Accounts menu will appear
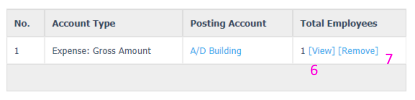
- Load Multiple Wage Accounts screen to assign accounts to employees:
- Select Wage Account Type
- Select Posting Account
- Click Load
- Select Employee(s). One or more employees can be selected for a single posting account.
- Select Class, if required, you can also manage employees in one Wage Account with different Classes or vice versa
- Click Add
- Employees will be moved to the Assigned Employees panel for selected Posting Account.
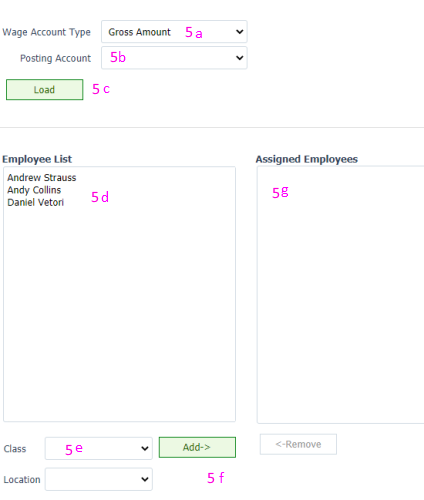
- List is also available to view employees in different accounts. Click View to see details
- Click Remove to delete employees assignments.
Export as Paycheck Journal
- Set export to Paycheck Journal in SimplePay
- Go to NetSuite>Account Settings. Set Export Payroll = Paycheck Journal
- Dropdowns will be populated with payroll Items created in NetSuite
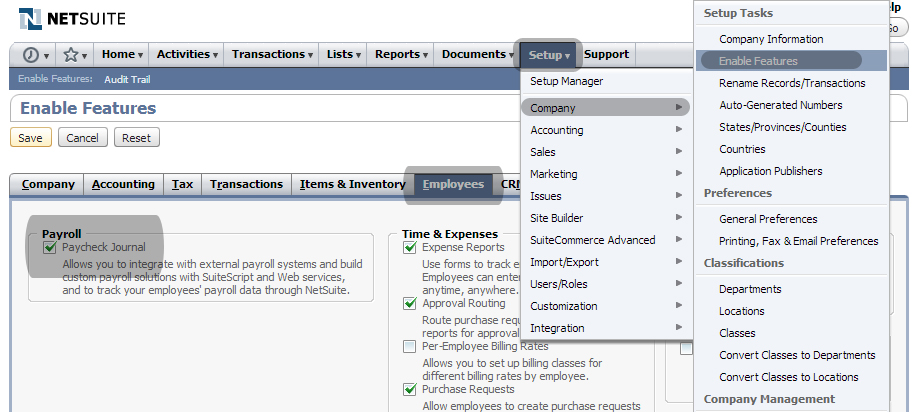
- Enable Paycheck Journal in NetSuite
- Login to your NetSuite account
- Go to Setup>Company>Enable Features
- Click on Employees Tab
- Select Paycheck Journal checkbox and click Save to enable Paycheck Journal in NetSuite
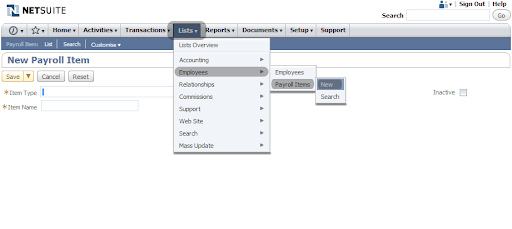
- Create Payroll Items in NetSuite
- Once Paycheck Journal feature is enabled in NetSuite , you can create payroll items
- Go to List>Employees>Payroll Items>New to create payroll items
- These payroll items will be available in SimplePay for mapping in AddOns>NetSuite>Account Settings screen.
- Payroll Items / Accounts Synchronization
- After NetSuite has been connected with SimplePay, Payroll Items and Accounts can be synchronized
- Go to Add-Ons>NetSuite>Account Settings
- All Payroll Items / Chart of Accounts NetSuite will be available in drop downs. Set Payroll Items / Chart of Accounts for all Expenses & Liabilities and click Save.
- Export employees from SimplePay to NetSuite
- Go to Add-Ons>NetSuite>Export Data
- Click Export Employees
- All employees in SimplePay will be exported to NetSuite. SimplePay also shows number of employees not exported
- Employee information exported to NetSuite:
- Last Name
- First Name
- Phone
- External Id
- Middle Name
- Mobile Phone
- Subsidiary
- Labor Cost
- Birth Date
- Hire Date
- Release date
- Title
- Social Insurance Number
- Address Book
- Address1
- City
- Phone
- State
- Zip
- Department
- Name
- Subsidiary
- You can view exported employees in NetSuite from List > Employees
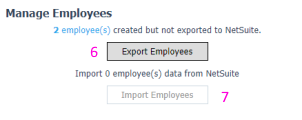
- Import employees from NetSuite to SimplePay
- To import employee from NetSuite, click Import Employees button
- The Employee information imported from NetSuite:
- Internal Id
- First Name
- Last Name
- Middle Name
- Address Book
- Address1
- Address2
- City
- Phone
- State
- Zip
- Mobile Phone
- Birth Date
- Hire Date
- Release Date
- Department Name
- Title
- Social Insurance Number
- SimplePay also shows number of employees not imported from NetSuite
- Select employee(s) using check box, which are to be imported in SimplePay
- Update the information retrieved from NetSuitebefore saving in SimplePay
- IMPORTANT for employee import/export
For the 2 apps to work together, employees must be created in 1 app and exported to the other. DO NOT create the same employees in both apps.
- Synchronize employees after import / export
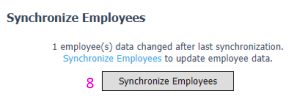
- Employees updated in NetSuite
- SimplePay provides an option to synchronize employees which have been updated in NetSuite.
- Employees for which data has been updated in NetSuite will be listed under Synchronize Employees panel.
- Clicking Synchronize Employees will update employee data in SimplePay.
- Following fields are updated from NetSuite to SimplePay:
NetSuite SimplePay Internal Id Custom Id First Name Given Name Last Name Last Name Middle Name Middle Initials Address 1 + Address 2 Address City City State Province Zip Post Code Phone Phone (Res) Mobile Phone Phone (Cell) Job Title Job (Created new if not present) Department > Name Department (Created new if not present) Email Email - Employees Updated in SimplePay
- After exported / imported, if any employee information is changed in SimplePay, employees will be automatically updated in NetSuite.
- Following fields are updated on user request from SimplePay to NetSuite: [missing?]
- Subsidiary will be added if One World account is selected in setup.
- Default Billing address book will be updated if present. Otherwise a new address book will be created.
SimplePay NetSuite Custom Id Internal Id Given Name First Name Last Name Last Name Middle Initials Middle Initials Email Email Phone (Res) Phone Phone (Cell) Mobile Phone SimplePay NetSuite Date of Birth Birth Date Date of Hire Hire Date Department Name Department Name (Created if not present) Job Name Job Title Last Salary Profile Rate Labor Cost Date of Termination Release Date Phone Phone (Cell) SimplePay NetSuite Address Address 1 City City Phone Phone Province State Post Code Zip
- Employees updated in NetSuite
Export payroll to NetSuite
- After accounts setup, payroll can be exported to NetSuite
- For Paycheck Journal export, employee synchronization between both applications is mandatory
- For Journal Entry export, payroll can be exported separately for each employee or grouped by Teams.
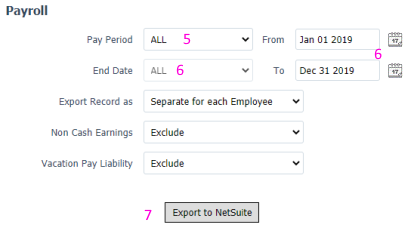
- Go to Add-Ons>NetSuite>Export
- Select Pay Period [active if more than one]
- Select End Date or Date Range
- Click Export
- Data exported to NetSuite and can be viewed in NetSuite
View payroll imported in NetSuite
- To view payroll exported in NetSuite, login to your NetSuite account
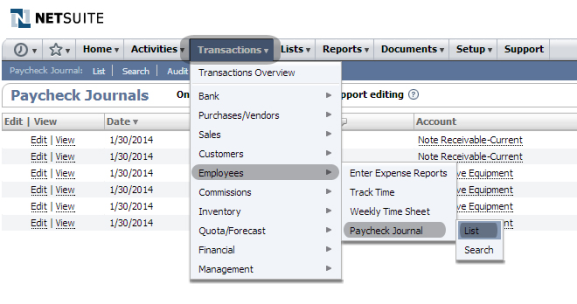
- View as Paycheck Journal
- Go to Transactions>Employees>Paycheck Journal>List
- Click View / Edit to see details
- View as Journal Entry
- Go to Transaction>Financial>Make Journal Entries>List
- Click on View / Edit to see details

Business Payments export to NetSuite
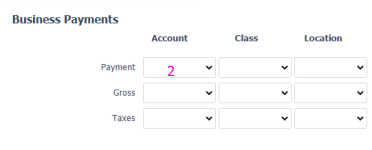
- If vendors or contractors [Business Payments] were paid from SimplePay, Business Payments Account Settings will be available
- All Chart of accounts in NetSuite will be available in drop downs. Set and click Save Settings
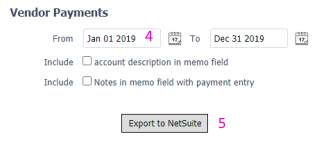
- Go to Add-Ons>NetSuite>Export Data
- Select date range
- Press Export
- Business Payments will be exported to NetSuite
- To view, Go to Transactions>Financial>Make Journal Entries>List
- All exported Business Payments will be available
- Click View / Edit to see details

NetSuite Single SignOn [SSO] to SimplePay
- Login to NetSuite
- Go to Customization>SuiteBundler>Search & Install Bundle
- In the Keywords text field, type SimplePay SSO and search
- Install SimplePay SSO Bundle
- A preview of files to be copied/added to your account with the bundle will be displayed. Click Install Bundle [bottom right of screen]
- Click OK to continue
- Installed bundles list will be displayed, wait for SimplePay SSO bundle to be installed
- The status will change to a tick mark when the bundle is installed. Refresh the page to monitor status
- In SimplePay, go to Add-Ons>NetSuite>Setup
- Generate a connection point url. Copy the URL. (Only Company admins can generate connection point URL in SimplePay).
- Go to your NetSuite Account
- Go to Setup->Integration->SuiteSignOn. Edit Login to SimplePay record
- Paste copied url to URL field under Connection Points subtab (Replace existing url).
- Go to Lists>Accounting>SimplePay.ca. A new page will open where you can login to SimplePay
- You need to login to your Simplepay account for the first time for confirmation
- It will take about 5 to 10 minutes to show SimplePay.ca link in NetSuite Lists>Accounting menu.