

- NetSuite Setup
- Journal Entry Settings
- Multiple Wage Accounts
- Paycheck Journal Settings
- Export and View Data
- Business Payments
- Single SignOn
-
NetSuite Setup in
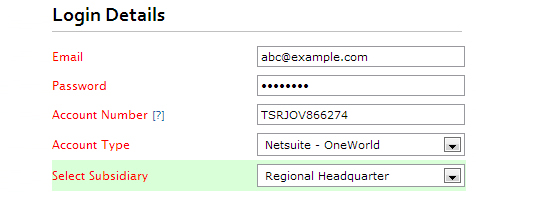
- Login to your account
- Go to Setup > General Ledger > NetSuite > Setup
- Enter your NetSuite Login information
- Select Account type (NetSuite / NetSuite OneWorld)
-
Enter Account Number
-
For NetSuite OneWorld you can find account number in your NetSuite OneWorld account on following page
- Setup > Custom > NC Product Registration
-
For Simple NetSuite you can find account number in your NetSuite account on following page
- Setup > Integration > Web Services Preferences
-
For NetSuite OneWorld you can find account number in your NetSuite OneWorld account on following page
- If you have selected NetSuite OneWorld Account you will also have to select a Subsidiary
-
Payroll Data Export Formats
-
Payroll data can be exported from to NetSuite in following formats
-
Journal Entry
- A separate journal for each employee
-
Journal entry grouped by Team for each pay period
- Employees can be grouped in teams from Employee Setup page
-
Journal entry grouped by Department for each pay period
- Employees can be grouped in departments from Employee Setup page
- A separate journal for each pay period
-
Paycheck Journal
- A separate journal for each employee
- Paycheck Journal feature cannot be selected for Non-Canadian Subsidiaries in NetSuite One World account
-
Journal Entry
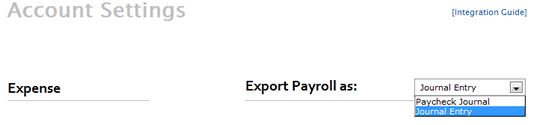
- Format can be selected from Account Settings page in
-
Restrictions
- You MUST choose Journal Entry format if you plan to integrate TribeHr with the 2 systems
-
Payroll data can be exported from to NetSuite in following formats
-
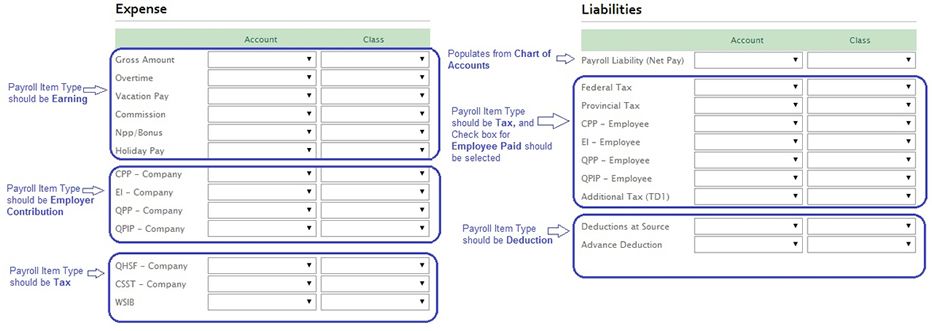
Payroll Data as Journal Entry
- In Account Settings page select Export Payroll as Journal Entry
-
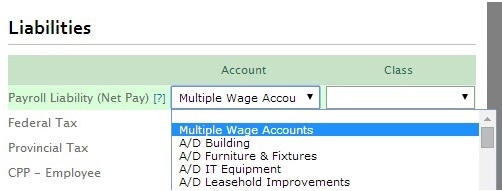
Dropdowns will be filled by Chart of Accounts created in NetSuite
- Accounts which have currency other than CAD will be disabled and cannot be selected
- Select appropriate accounts against payroll fields
-
Create Chart of Accounts in NetSuite
- Chart of Accounts can be created in NetSuite in following screen
- Setup > Accounting > Chart of Accounts

-
IMPORTANT ALERT for TribeHr clients
If you plan to use NetSuite and TribeHr with your account, you MUST choose 'Journal Entry' option.
-
Multiple Wage Accounts Selection
If employees are managed in different �Wage Accounts� in NetSuite, it can be selected in SimplePay Account Settings. (for both Journal Entry and Paycheck Journal)
- Select Multiple Wage Account option in and press Save button
- After Saving the settings, Manage Wage Accounts tab will appear in top right

-
Click on the link, page will be loaded, to assign wage accounts to employees, steps are
- Select Wage Account, page will be reloaded
- Select Employee(s), you can select one or more employees for single wage account
- Select Class, if required, you can also manage employees in one Wage Account with different Classes or vice versa
- Press Add button
- e. Employees will be moved to panel on right side, now selected Account and Class is assigned to these employees
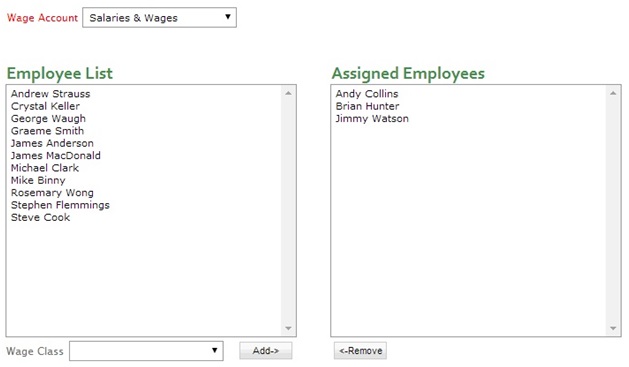
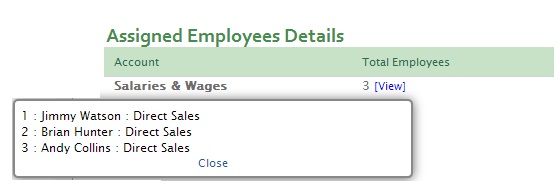
- List is also available to view employees in different accounts, click on View link to see details
- Steps for Paycheck Journal Settings
- Export Payroll Data as Paycheck Journal
- Enable the Paycheck Journal feature in NetSuite
- Create Payroll Items in NetSuite
- Payroll Items / Accounts Synchronization
- Export Employees from to NetSuite
- Import Employees from NetSuite to
- Synchronize Employees after Import /Export
-
Export Payroll Data as Paycheck Journal
- In Account Settings page select Export Payroll as Paycheck Journal
- Dropdowns will be filled by Payroll Items created in NetSuite
-
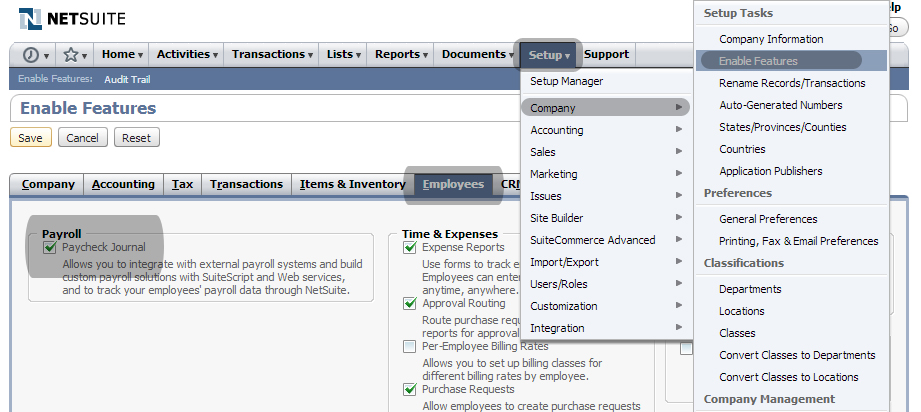
Enable the Paycheck Journal feature in NetSuite
- Login to your NetSuite account
- Go to Setup > Company > Enable Features
- Click on Employees Tab
- Select the Paycheck Journal feature checkbox and press Save button to enable Paycheck Journal in NetSuite
-
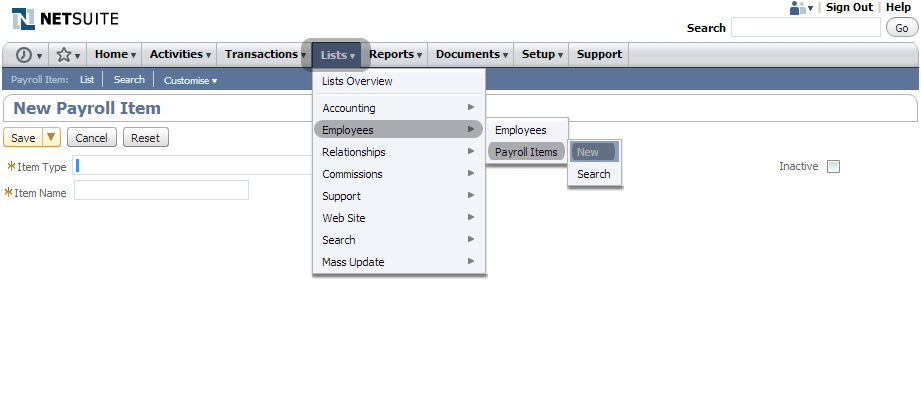
Create Payroll Items in NetSuite
- Once Paycheck Journal feature is enabled in NetSuite, you can create Payroll Items in NetSuite
- Go to List > Employees > Payroll Items > New to create Payroll Items
- These Payroll Items will be available in SimplePay for selection against SimplePay fields in NetSuite Account Settings page
-
Payroll Items / Accounts Synchronization
- After you have set up NetSuite in , you can synchronize Payroll Items and Accounts
- Go to Setup > General Ledger > NetSuite > Account Settings page
- All Payroll Items / Accounts created in NetSuite will be available in drop downs, select required Payroll Items / Accounts and press Save Settings button
-
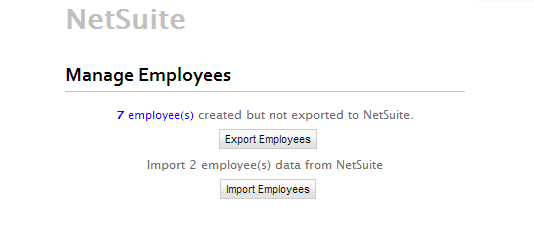
Export Employees from to NetSuite
- Go to Setup > General Ledger > NetSuite > Synchronize Employees
- Click Export Employees button, to export data from SimplePay to NetSuite
- also shows number of employees not exported to NetSuite
- All employees in will be exported to NetSuite
- You can view exported employees in NetSuite from List > Employees
-
Import Employees from NetSuite to
- To import employee from NetSuite, click Import Employees button
- also shows number of employees not imported from NetSuite
- Select employee(s) using check box, which are to be imported in
- Update the information retrieved from NetSuite before saving in
-
IMPORTANT ALERT for Employee Import/Export
For the 2 apps to work together, employees must be created in 1 app and exported to the other. DO NOT create same employees in both the apps.
-
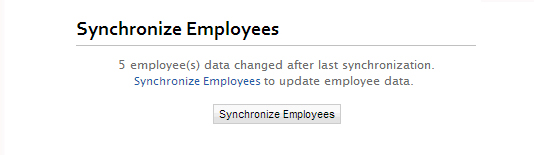
Synchronize Employees after Import /Export
-
Employees updated in NetSuite
-
provides option, to synchronize data for employees which have been updated in NetSuite.
- Employees for which data has been updated in NetSuite, will be listed under Synchronize Employees panel.
- User can press Synchronize Employees button to update employee data in .
-
provides option, to synchronize data for employees which have been updated in NetSuite.
-
Employees Updated in
- After employees are exported / imported, if user changes any employee information in , Employee information will be auto updated in NetSuite
-
Employees updated in NetSuite
-
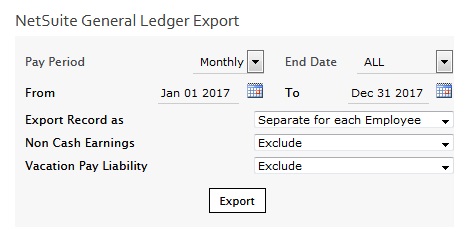
Payroll Data Export to NetSuite
- After accounts setup, Payroll data can be exported to NetSuite
- For Paycheck Journal export, employee synchronization between both applications is mandatory
- For Journal Entry export, you can export payroll data separately for each employee or group by Teams, Teams can be created and assigned in Employee Setup page.
- Go to Setup > General Ledger > NetSuite > Export Data page
- Select Pay period type
- Select End date or date range
- Press Export button
- Data will be exported to NetSuite and you can view data in your NetSuite account
-
View Payroll Exported data in NetSuite
- To view exported data in your NetSuite account, Login to your NetSuite account
-
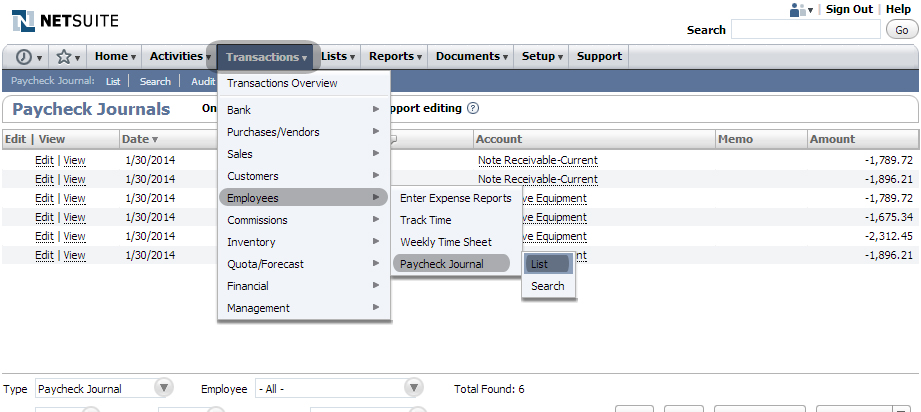
View Payroll data exported as Paycheck Journal
- Go to Transactions > Employees > Paycheck Journal > List
- Click on View / Edit to see details
-
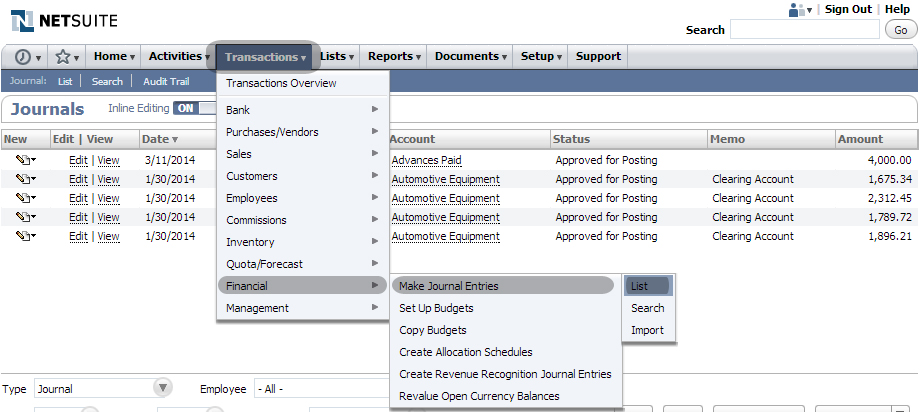
View Payroll data exported as Journal Entry
- Go to Transaction > Financial > Make Journal Entries > List
- Click on View / Edit to see details
-
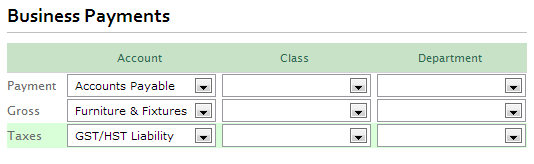
Business Payments export to NetSuite
- If business payments have been made in your account, Business Payments account settings will be available
- All accounts created from Chart of accounts in NetSuite will be available in drop downs
- Select required accounts and press Save Settings button
- After accounts have been saved, go to Export Data page
- Select date range
- Press Export button
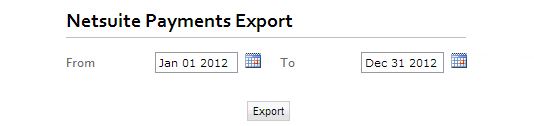
- Business payments will be exported to NetSuite
- To view your exported Business Payments in NetSuite
- Go to Transactions > Financial > Make Journal Entries > List
- All exported Business payments will be available
- Click on View / Edit to see details
-
-
NetSuite Single SignOn to
- Login to NetSuite.
- Go to Customization->SuiteBundler->Search & Install Bundle.
- In Keywords text field, type SimplePay SSO and search.
- Install SimplePay SSO Bundle.
- A preview of files, to be copied/added to your account with bundle will be displayed. Click Install Bundle (Available at bottom right of screen).
- Confirmation message will appear, click OK to continue.
- Installed bundles list will be displayed, wait for SimplePay SSO bundle to be installed.
- The status will change to a tick mark when bundle is installed. Refresh the page to monitor the status.
-
Now login to SimplePay.ca, go to
 ->
General Ledger->NetSuite->Setup page
->
General Ledger->NetSuite->Setup page
-
Generate a connection point url.
Copy this URL.
(Only Company admins can generate connection point URL in SimplePay). - Go to your NetSuite Account.
- Go to Setup->Integration->SuiteSignOn. Edit Login to SimplePay record.
- Paste copied url to URL field under Connection Points subtab (Replace existing url).
- Go to Lists->Accounting->SimplePay.ca a new page will open where you can login to SimplePay.
- You need to login to your Simplepay account for first time for confirmation.
- It will take about 5 to 10 minutes to show SimplePay.ca link in NetSuite Lists->Accounting menu.