Integration with Xero
Overview: This guide completes the following steps:
- Configure Xero
- Exporting Data
- Tracking Categories
Configure Xero
- To get started, go to Add-Ons>Xero>Settings.
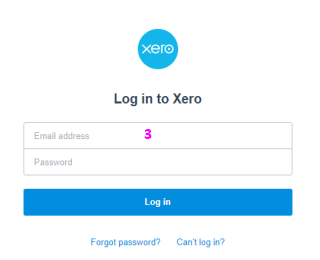
- Click on message for Xero to authenticate SimplePay.
- Login with your Xero credentials.
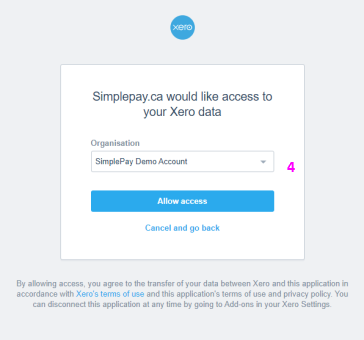
- Allow access to SimplePay to post transactions to your account [pressing the button will redirect back to SimplePay.]
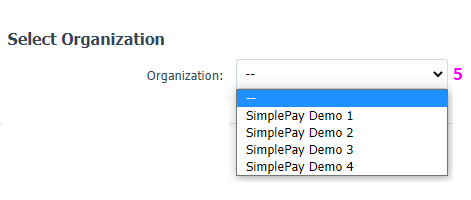
- Select the Organisation where you want to export data.
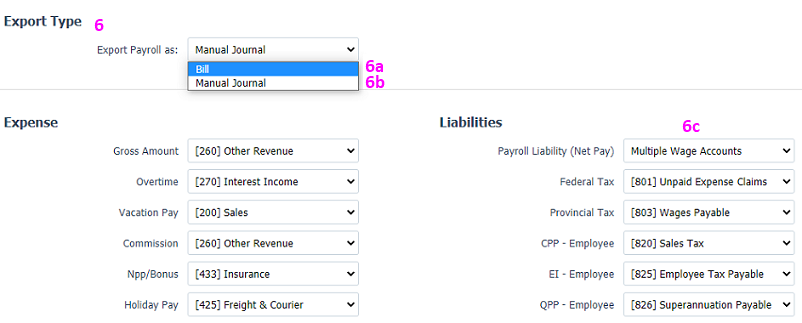
- Select how to export data to Xero:
- Bill
- All transactions will be posted as Bill.
- Bill can be viewed in Xero from Business>Bills to pay>Draft
- Manual Journal
- Only Payroll transactions will be posted as Journal, all other transactions will be posted as Bill.
- Journals can be viewed in Xero from Accounting>Reports>All Reports>Journal Report>Manual Journals>Draft
- User can select Multiple Wage accounts for employees in case of Manual Journal.
- Multiple Wage Accounts
- To manage wages in more than one account select 'Multiple Wage Accounts' option In Payroll Liability (Net Pay) dropdown and Save.
- New Menu option 'Manage Wage Accounts' added.
- Employees can be managed in multiple wage accounts from this screen.
- Bill
- Use chart of accounts imported from Xero in the drop down lists and map expenses and liabilities in SimplePay to them.
Exporting Data
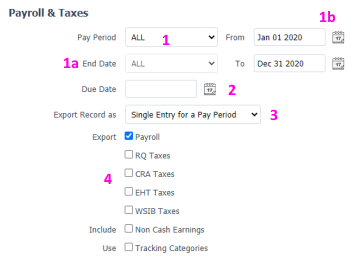
- Select [in case of multiple periods] which one to export, or All.
- Export by pay period end date OR
- Export by date range
- Set ‘Due Date’. This is set as the bill due date in Xero.
- Export Payroll and/or Taxes [separate records for CRA, RQ and WSIB) in following
formats.
- Single Entry for a Pay Period
- Bill, group by Expense Category for the pay period (Employees can be grouped in Expense Categories in Employee>Setup page)
- Bill, group by Department for the pay period (Employees can be grouped in Departments in Employee>Setup page)
- Separate Bill for each employee in the pay period
- After selection click ‘Export to Xero’ button to send data to Xero.
Tracking Categories
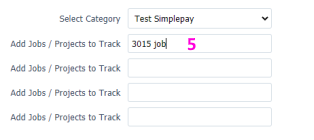
Jobs/Project can be tracked in [SimplePay] timesheets by adding Timesheet Categories. These tracking categories in SimplePay will be connected to tracking categories in Xero. Go to Settings>Timesheet>Categories.
- Give a title to job/projects in SimplePay. This Category Title must be exactly the same as the Tracking Categories name in Xero (Case Sensitive).
- Select Checkbox to (Use as Tracking Category in Xero).
- If checked, this category will be required to be selected for timesheet data entry.
- Sets how job/project data is entered in the timesheet.
- Drop down means a selection from a list.
- Text means typed in data.
- If data input [4a] is drop down, create contents for selection in timesheet here.
These must be exactly the same as Tracking Category Options created in Xero (Case Sensitive).
To add timesheet to a pay period, go to Payroll>Timesheets and select an employee.
When journal is exported separated by job/projects, only the gross salary will be divided into tracking categories [not the deductions].
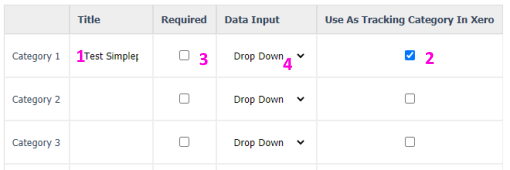
Maximum 2 ‘Categories’ can be defined in SimplePay to be used as tracking categories in Xero.